Listen To This Article In Podcast Format

Overhead microphones catch the full sound of a drum kit. They pick up the cymbals’ shimmer and the room’s vibe, making the drums come alive. Without them, the beat might feel flat, missing the crisp highs and wide space that bring energy to a song. Many pro drummers and sound engineers swear by overheads to nail that perfect balance and punch. For anyone wanting their drum recordings to pop and feel real, using overhead microphones is a game changer. Keep reading to find out why they make all the difference in creating music that hits just right.

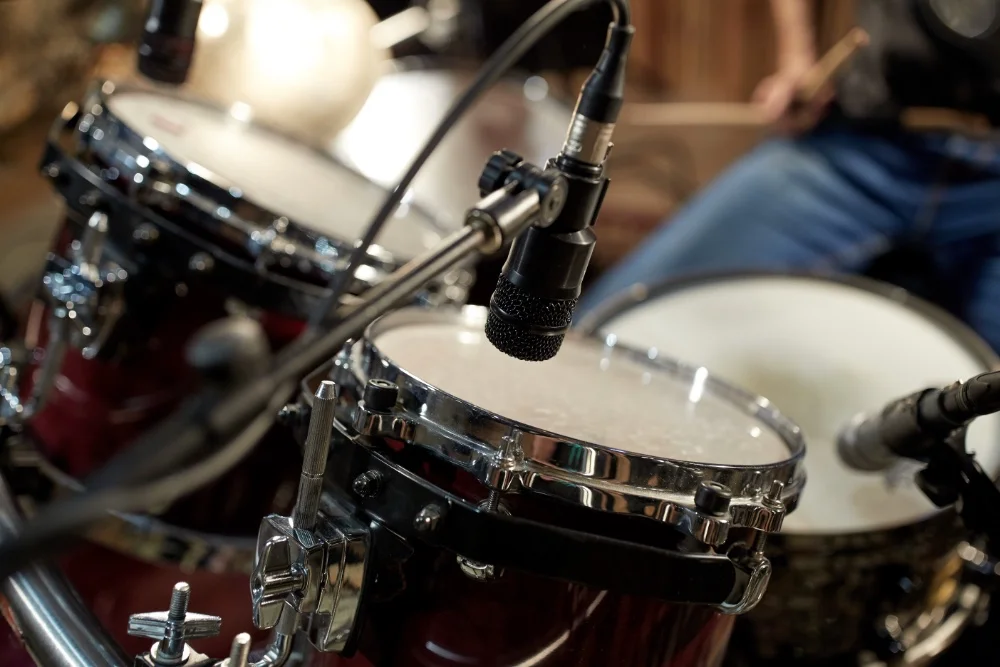
They pick up the cymbals, the toms, and the general ambience of the kit, providing a cohesive and balanced representation of the drummer’s performance.

However, to truly optimize the sound of the overheads, you need to EQ them well.

In this article we’ll cover how you can not only EQ your drums but also on how to nail your drum overhead mic placement to get the best possible mix.

Overhead Mic Placement

photo of a drum kit with overhead microphones positioned above it

It’s important to start with the best possible overhead mic placement.

Without a good recording you’re going to struggle to get a clean and punchy sound when EQing.

The positioning of the mics can have a significant impact on the captured sound, affecting the balance between cymbals, toms, and the overall kit.

Experiment with different placements to find what works best for your specific kit and recording space.

Here are some common methods for your overhead mic placements:

Spaced Pair (A/B Configuration)

X-Y Configuration

ORTF Technique

Glyn Johns Technique

Recorderman Technique

Mid-Side (M/S) Configuration

General Tips for Overhead Mic Placement

Let’s now cover the EQing of your drum overheads.

Identifying Frequencies To Cut

a man playing drums with a microphone together with cymbals

When EQing overheads, it’s often necessary to make strategic cuts to problematic frequency ranges.

Low-end rumble and muddiness, typically below 100-200 Hz, can clutter up the mix and make the drums sound boomy and indistinct.

Use a high-pass filter to gently roll off these low frequencies, cleaning up the low end and allowing the kick and bass to occupy that space instead.

Another common issue is boxiness from snare bleed, which often resides in the 200-500 Hz range.

A narrow cut in this area can help reduce the boxy character and improve clarity.

Harsh cymbal frequencies, usually around 3-5 kHz, can also be tamed with a precise cut to smooth out the overall cymbal sound.

Frequency RangeProblemSolution
Below 100-200 HzLow-end rumble, muddinessHigh-pass filter
200-500 HzBoxiness from snare bleedNarrow cut
3-5 kHzHarsh cymbal frequenciesPrecise cut

Can The Right EQ Plugin Transform Your Overheads?

7-Day-Money-Back-Guarantee

Boosting Frequencies for Enhancement

In addition to cuts, targeted boosts can enhance the positive aspects of the overhead sound.

Here is a table of the frequency ranges and boosts to make to these areas for a specific sound:

Frequency RangeDescription
8-12 kHzAdd “air” and brightness to cymbals
5-7 kHzEnhance attack and stick definition
100-250 HzFatten up toms in the overheads

EQ Techniques and Tips for Drum Overhead EQing

When applying EQ to overheads, a combination of different techniques can yield the best results.

High-pass filtering is essential for removing low-end rumble and cleaning up the mix.

Surgical cuts with a narrow Q (bandwidth) are ideal for precisely targeting and taming specific problem frequencies without affecting the surrounding areas too much.

For enhancing desirable ranges, gentle broad boosts with a wide Q can add character and dimension without sounding unnatural.

It’s also crucial to check the phase alignment between the overhead mics, as phase issues can cause frequency cancellations and a thin, weak sound.

Adjust the mic positions or use subtle time-alignment tools to ensure good phase coherence.

Here is a summary of the tips and techniques:

Genre and Style Considerations

a woman positioning the microphone of the drum kits

The approach to overhead EQ can vary depending on the genre and desired drum sound.

For more open, natural-sounding drums, a lighter touch with EQ can be appropriate, preserving the inherent character of the kit and room.

In contrast, modern, polished drum sounds often benefit from more aggressive EQ, with stronger cuts and boosts to achieve a tighter, more focused sound.

Consider the overall production style and how the overhead EQ complements the close mics on individual drums.

The goal is to create a cohesive and balanced drum sound that fits the musical context.

Here is a table of the EQ approach to your overhead drums by genre

GenreEQ Approach
JazzLight, preserving natural kit sound
RockModerate, balancing punch and clarity
MetalAggressive, tight and focused sound
Hip-hopStrong low-end, crisp high-end for cymbals

Access 4,000+ Music Tools

Additional Resources For Learning how to EQ your Drum Overheads

Access over 4,000+ Music Production Tools

“SoundShockAduio

Subscribe to SoundShockAudio and access our vast library of tools, including VST Plugins, DAW templates, sample packs, and more.

Need more EQ help?

Check out all our EQing articles: